Auto layout and view animation
In September, I wrote about our Mac OS X 10.7 Lion Auto Layout. As auto layout is one of the building blocks for laying out user interface for next major update of Startupizer, and being new technology, I came across few issues that took me a while to figure out. In this post, I’ll cover some of them for my future reference and hopefully shed some light for those of you stumbling upon the same walls.
Animated view transitions with auto-layout
In the second half of my previous Auto Layout post, I wrote about dynamic views with auto-layout. The example I built demonstrated how to use auto-layout with a placeholder view that allowed swapping views in and out. The solution works fine, but it would be nice to use animated transitions, it would add a nice final touch to the app.
Now, for every Cocoa programmer, the word “animation” is probably hard wired with Core Animation inside our brains. And indeed, Core Animation provides transitions for replacing views, simply by using:
[[view animator] replaceSubview:currentView with:newView];
You can even choose different kinds of animations. But would it work with auto-layout? Turns out it does. Or kind of… As soon as you remove a view from view hierarchy, Cocoa automatically removes all layout constraints related with that view, so that part would be covered. Therefore my attempt was to replace previous subview with new one and then setup constraints for new view. Apart from transition setup and using above method, the example code didn’t change at all. The views were nicely animated in and out. But looking closer, all labels were rendered “washed out”, kind of like if bloom filter was applied over them. It looked like it only affected text and even though it would probably escape unnoticed by many users, it felt out of the place to me…
Going back to the board, I decided to go try with animating views manually. As I was only interested in animating push from left and right, the plan was simple:
- To push new view from right: add the new view to the right side of the existing view, then animate both view’s positions towards the left for a single width of the placeholder. This would look like the new view slides in from the right.
- To push new view from left: similar to above, just add the new view to the left side of existing view and animate both view positions towards the right side.
I already did that in the “old” springs and struts layout and it was as simple as setting up initial view frames, then animating frames as described above. The only “trick” was to remove the old view once the animation was finished. That was accomplished with by setting up CAAnimation delegate and responding to animationDidStop:finished: method. But this wasn’t working well with auto-layout system, most of the time it resulted in invalid layout and errors being spit out in the console. Thinking it over it became clear: layout system was fighting with the animations positioning the views. It might be that my subviews were using complex layouts themselves, but as I couldn’t really change those, I had to find working solution. The answer was in front of my nose: animating layout constraint constant!
Implementing animated view transitions
I used example 2 from the above mentioned auto-layout post as the base. First of all I deleted MyCustomViewController, added two view controllers to play with and removed all placeholder handling code from application delegate. Also added both child view controllers as properties to application delegate - not really the place to add those in real application, but good enough for the purpose of this example. Oh while at it, I also converted the project to ARC - as auto-layout is Lion only, there’s no good reason not to… (you can follow along this post by cloning the project from GitHub and using git checkout 126cd28fd7138fe492d89418140d8822f2079840, then open example 3 in Xcode).
Let’s first implement push from right and add the opposite afterwards. As both will probably reuse a lot of underlying code, this will require some refactoring later on, but it’s simpler to start with a solution to a single problem and make it generic when needed or once the whole problem space is understood, even though the need is anticipated in advance. Thinking it over, there are couple of points to keep in mind:
- When adding new view, setup the same set of layout constraints as for “normal” view, except change the horizontal constant so that the view is positioned just outside the placeholder, on the right side.
- Afterwards, animate both constraints so that the views slide towards the left.
- When animation ends, remove the original view out of the placeholder.
- If this is the first view being added (i.e. setting up the initial view), it would probably look weird to have it slide in, so just add it with no animation.
Handling static transitions
Let’s first tackle initial view handling, but make it slighlty more reusable, so that it can replace the views. This is effectively the same solution as the last time:
- (void)replacePlaceholderViewWith:(NSViewController *)controller {
	if (controller == _currentViewController) return;
	self.currentViewController = controller;
	NSView *placeholderView = self.placeholderView;
	NSView *currentView = self.placeholderView.subviews.lastObject;
	NSView *newView = self.currentViewController.view;
	if (currentView) {
		[currentView removeFromSuperview];
	}
	if (newView) {
		NSDictionary *views = NSDictionaryOfVariableBindings(newView);
		[newView setTranslatesAutoresizingMaskIntoConstraints:NO];
		[placeholderView addSubview:newView];
		[placeholderView addConstraints:[NSLayoutConstraint constraintsWithVisualFormat:@"H:|[newView]|" options:0 metrics:nil views:views]];
		[placeholderView addConstraints:[NSLayoutConstraint constraintsWithVisualFormat:@"V:|[newView]|" options:0 metrics:nil views:views]];
	}
}
I wont explain the details here, check Auto Layout post in case you get lost somewhere. Next, we want to start with view controller 1, so we add this code to applicationDidFinishLaunching::
- (void)applicationDidFinishLaunching:(NSNotification *)note {
	[self replacePlaceholderViewWith:self.viewController1];
}
Running the application should result in our view 1 being displayed in the window like this:
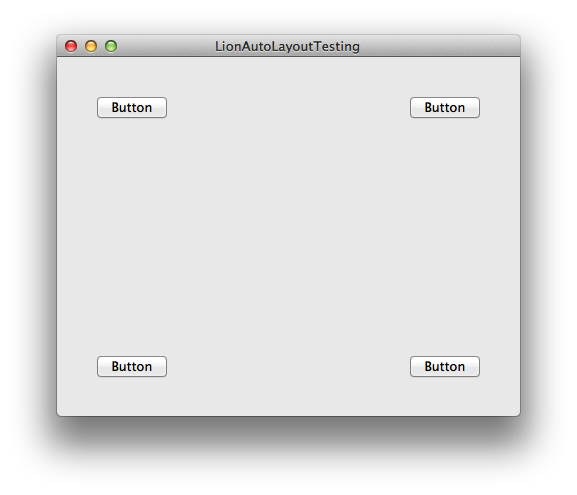
The view is composed from four buttons, one in each corner. This wont likely win us any award, but we can verify layout is working correctly - resize the window and the view should react accordingly.
Switching between views
Now let’s add some user interaction between the views - whichever button the user clicks, we want to switch to the other view controller and vice versa (the second view controller is also composed from four buttons, but they are gradient buttons so that we can quickly distinguish between the views).
As the placeholder is handled on application delegate class, we’ll add two IBAction methods to it, then send the message to first responder within each view. Let’s add the two methods to LionAutoLayoutTestingAppDelegate, here’s the implementation:
- (IBAction)changeToViewController1:(id)sender {
	[self replacePlaceholderViewWith:self.viewController1];
}

- (IBAction)changeToViewController2:(id)sender {
	[self replacePlaceholderViewWith:self.viewController2];
}
We also need to send the actions from the view. Open View1.xib and control-drag from each button to First Responder and select changeToViewController2 from the received actions popup menu (you will need to scroll down a bit, or start typing the action name to quickly scroll to it):
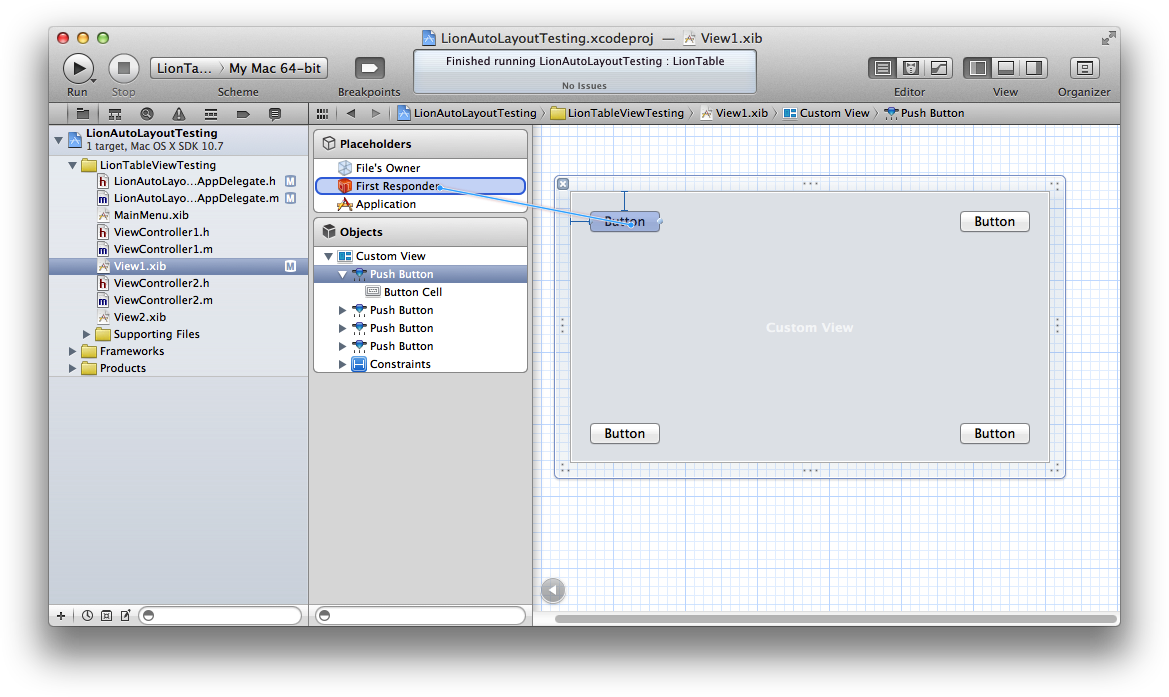

Repeat the same step for the other three buttons, then open View2.xib and repeat the whole process for all four buttons there, except this time link to changeToViewController1. With this in place, run the project again, and you should be able to switch between the two views by clicking the buttons!
Adding animated transitions
To add transitions, we’ll create two new methods: slideViewControllerFromLeft: and slideViewControllerFromRight:. We’ll also need a custom animation so that we can get informed when animation ends via delegate method. We also want to reuse as much of the code from existing replace method as possible. Let’s start with the later first - we’ll create a method that arranges everything and use a block as a callback:
typedef void(^GBPlaceholderReplaceBlock)(NSView *placeholder, NSView *currentView, NSView *newView);

- (void)replacePlaceholderViewWith:(NSViewController *)controller block:(GBPlaceholderReplaceBlock)handler {
	if (controller == self.currentViewController) return;
	self.currentViewController = controller;
	NSView *placeholderView = self.placeholderView;
	NSView *currentView = self.placeholderView.subviews.lastObject;
	NSView *newView = self.currentViewController.view;
	handler(placeholderView, currentView, newView);
}
As you can see we prepare all the views and pass them to block. This is convenient so that we don’t have to repeat this (and possibly get it wrong) in each “concrete” method. To test it, let’s update existing replacement method to use the block:
- (void)replacePlaceholderViewWith:(NSViewController *)controller {
	[self replacePlaceholderViewWith:controller block:^(NSView *placeholder, NSView *currentView, NSView *newView) {
		if (currentView) {
			[currentView removeFromSuperview];
		}
		if (newView) {
			NSDictionary *views = NSDictionaryOfVariableBindings(newView);
			[newView setTranslatesAutoresizingMaskIntoConstraints:NO];
			[placeholder addSubview:newView];
			[placeholder addConstraints:[NSLayoutConstraint constraintsWithVisualFormat:@"H:|[newView]|" options:0 metrics:nil views:views]];
			[placeholder addConstraints:[NSLayoutConstraint constraintsWithVisualFormat:@"V:|[newView]|" options:0 metrics:nil views:views]];
		}
	}];
}
Now, let’s add the two slide methods, slideViewControllerFromRight: first:
- (void)slideViewControllerFromRight:(NSViewController *)controller {
	[self replacePlaceholderViewWith:controller block:^(NSView *placeholder, NSView *currentView, NSView *newView) {
		CGFloat width = placeholder.bounds.size.width;
		NSArray *constraints = [self layoutConstraintsForView:newView offsetBy:NSMakePoint(width, 0.0)];
		[newView setTranslatesAutoresizingMaskIntoConstraints:NO];
		[placeholder addSubview:newView];
		[placeholder addConstraints:constraints];
		[[[placeholder.constraints objectAtIndex:0] animator] setConstant:-width];
		[[[constraints objectAtIndex:0] animator] setConstant:0.0];
	}];
}
We reuse replacePlaceholderViewWith:block: method to do everything necessary and deal with details in our block:
- In the first line of the block we get the width the child views must have and use that to setup constraints so that the view is positioned on the right side of existing view, just outside visible range. Then we prevent translating autoresizing mask into constraints (you may experiment with this: depending how the layout is implemented on the child view, you may get errors if you leave this on).
- After constratins are prepared, we add the subview to placeholder and apply constraints.
- Finally we animate constant for layout constraints that specify horizontal offset of the view; we “push” existing view to the left for it’s width, so that it effectively moves out of sight, and move new view to 0.0 so that it becomes fully visible.
And that’s it! As we use animator proxy on the layout constraint, the views nicely animate! slideViewControllerFromLeft: is basically the same, except that we set the new view initial constant to -width and push both views to the right - see full code in the example. The only mistery requiring some explanation is layoutConstraintsForView:offsetBy:
- (NSArray *)layoutConstraintsForView:(NSView *)view offsetBy:(NSPoint)offset {
	NSMutableArray *result = [NSMutableArray arrayWithCapacity:4];
	NSView *placeholder = self.placeholderView;
	[result addObject:[NSLayoutConstraint constraintWithItem:view
								   attribute:NSLayoutAttributeLeft
								   relatedBy:NSLayoutRelationEqual
									  toItem:placeholder
								   attribute:NSLayoutAttributeLeft
								  multiplier:1.0 constant:offset.x]];
	[result addObject:[NSLayoutConstraint constraintWithItem:view
								   attribute:NSLayoutAttributeWidth
								   relatedBy:NSLayoutRelationEqual
									  toItem:placeholder
								   attribute:NSLayoutAttributeWidth
								  multiplier:1.0 constant:0.0]];
	[result addObject:[NSLayoutConstraint constraintWithItem:view
								   attribute:NSLayoutAttributeTop
								   relatedBy:NSLayoutRelationEqual
									  toItem:placeholder
								   attribute:NSLayoutAttributeTop
								  multiplier:1.0 constant:offset.y]];
	[result addObject:[NSLayoutConstraint constraintWithItem:view
								   attribute:NSLayoutAttributeHeight
								   relatedBy:NSLayoutRelationEqual
									  toItem:placeholder
								   attribute:NSLayoutAttributeHeight
								  multiplier:1.0 constant:0.0]];

	CABasicAnimation *animation = [CABasicAnimation animation];
	animation.timingFunction = [CAMediaTimingFunction functionWithName:kCAMediaTimingFunctionEaseInEaseOut];
	animation.delegate = self;
	[[result objectAtIndex:0] setAnimations:[NSDictionary
		dictionaryWithObject:animation
		              forKey:@"constant"]];
	return result;
}
A bit more verbose, but nothing complicated: in the first part, we setup all the constraints, top to bottom:
- We align child view left with parent placeholder left coordinate by the given offset.
- We set the width of the child to match the width of the parent placeholder view.
- We align child view top with parent placeholder top coordinate by the given offset.
- We set the height of the child to match the height of the parent placeholder view.
In the second part, we setup the animation and assign it to the first constraint (the one that specifies child view left coordinate). This is the key to making left/right slides possible: we rely on the fact that the first constraint controls the left coordinate of the view. And we use that fact when animating constant in slideViewControllerFromRight: and slideViewControllerFromLeft:!
Just one more thing
Actually this has nothing to do with animating views, but it’s something on which I lost a lot of time figuring out. I got layout errors in Startupizer that didn’t make sense - here’s the output:
2011-12-21 19:07:09.017 Startupizer[5809:60b] Unable to simultaneously satisfy constraints:
(
    "<NSLayoutConstraint:0x10b0bd3b0 V:[NSView:0x10b0b5c60(64)]>",
    "<NSLayoutConstraint:0x10b0bd410 V:[NSView:0x10b0b5c60]-(2)-|   (Names: '|':NSView:0x10b0b66d0 )>",
    "<NSLayoutConstraint:0x10b0bd320 V:|-(2)-[NSView:0x10b0b5c60]   (Names: '|':NSView:0x10b0b66d0 )>",
    "<NSLayoutConstraint:0x10aa48280 V:[NSView:0x10aa48d80(70)]>",
    "<NSLayoutConstraint:0x10b0eb130 V:[NSView:0x10b0b66d0]-(0)-|   (Names: '|':NSView:0x10aa48d80 )>",
    "<NSLayoutConstraint:0x10b0eb0b0 V:|-(0)-[NSView:0x10b0b66d0]   (Names: '|':NSView:0x10aa48d80 )>"
)
Looking at this output, I understood all constraints, except of where the 70 pixel height constraints came from. Using [NSView _subtreeDescription] I could pinpoint the views, but still had no clue. Then, after almost a day of trying various solutions (none worked), I spotted the constraint burried inside my custom placeholder view in Xcode, like this:
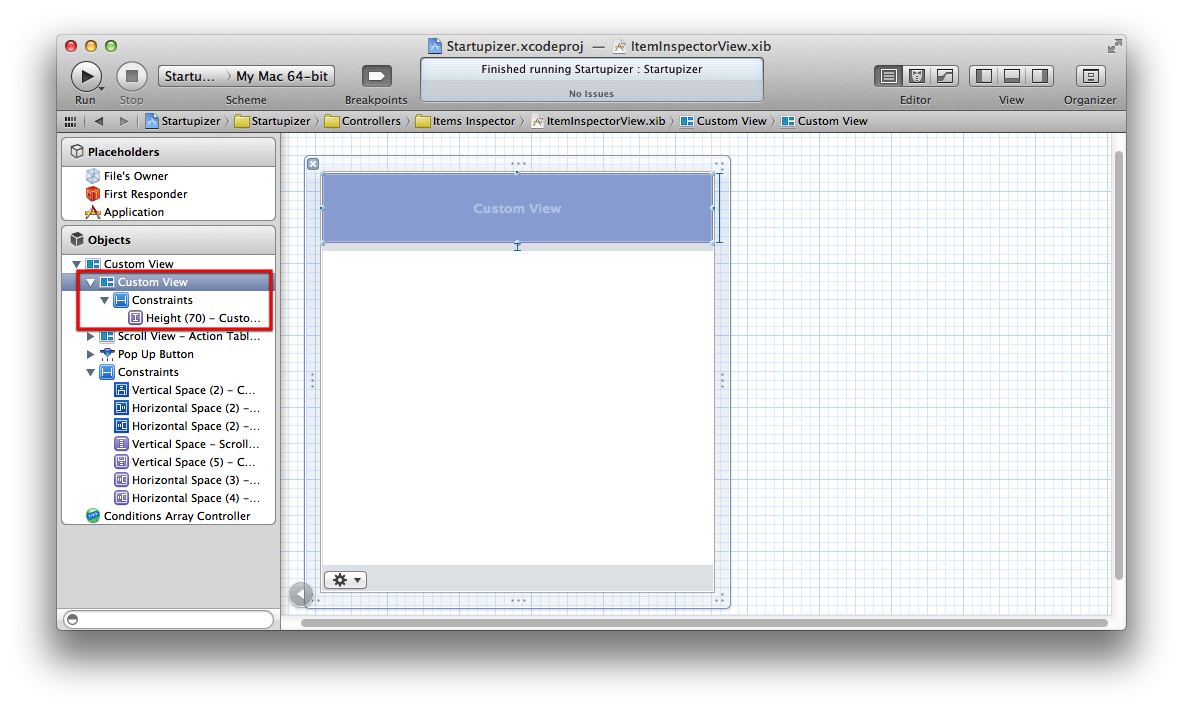
After playing with this, I realized Xcode (version 4.2, build 4D199) creates these constraints when the view is resized inside IB - they aren’t there initially when the view is dragged out of the library. Not sure if this is bug or just my misunderstanding (usually constraints for subviews are expressed on the parent view, plus this worked in the past). Anyway, the solution is simple: as you can’t delete the constraint from inside Xcode, just remove all constraints from the view in code in awakeFromNib or similar. You may need to “get” the view out of the nib via IBOutlet too.
Conclusion
Using animated view transitions isn’t that hard once you grasp on the concepts. Unfortunately CATransition didn’t work for me, but doing “full” animation also isn’t that hard. Perhaps few more points to keep in mind:
- The code is simplified to keep it simple. For example it relies on ordering of constraints in array which probably isn’t the best idea.
- Slide methods should only be used when replacing existing view, it would not work for setting initial view for example (but shouldn’t be hard to allow this).
replacePlaceholderViewWith:block:may be extended with additional logic such as informing current view controller that it’s about to go out and new view it’s about to become main view or other, depending your project needs.layoutConstraintsForView:byOffset:allows passing in x and y offset, but it only applies animation to horizontal constraint - if you need vertical slides, you can attach the animation to vertical constraint also and animate those.