View based table views in Lion - part 2 of 2
With OS X 10.7 Lion, Apple has introduced many cool features to it’s AppKit. One of those that caught my attention right away, was view based table views. It seemed like the missing widget I was looking for when implementing Startupizer’s items list. So I decided to take a spin as a research for directions for 2.0 release. In this post, I’ll go step by step through a small project gradually adding features until it will look similar to current main window.
This is second and last part covering view based table views in Lion. It works on foundation laid in part 1 where we took a look at how to setup view based table view in code. We’ll extend this to use bindings instead of code to populate the table view, as well as show how we can animate row resizing.
Using bindings (example 4)
Steps at a glance:
- Add
NSArrayControllerin IB - Change controller’s class name to
Item - Bind content array to app delegate’s items key path
- Bind table column’s value to array controller’s arrangedObject with no model key path
- Bind each item cell view control to Item Cell View with model key path objectValue.modelKey.
- Unlink table view’s data source and delegate
- Delete all data source and delegate related code from app delegate source files
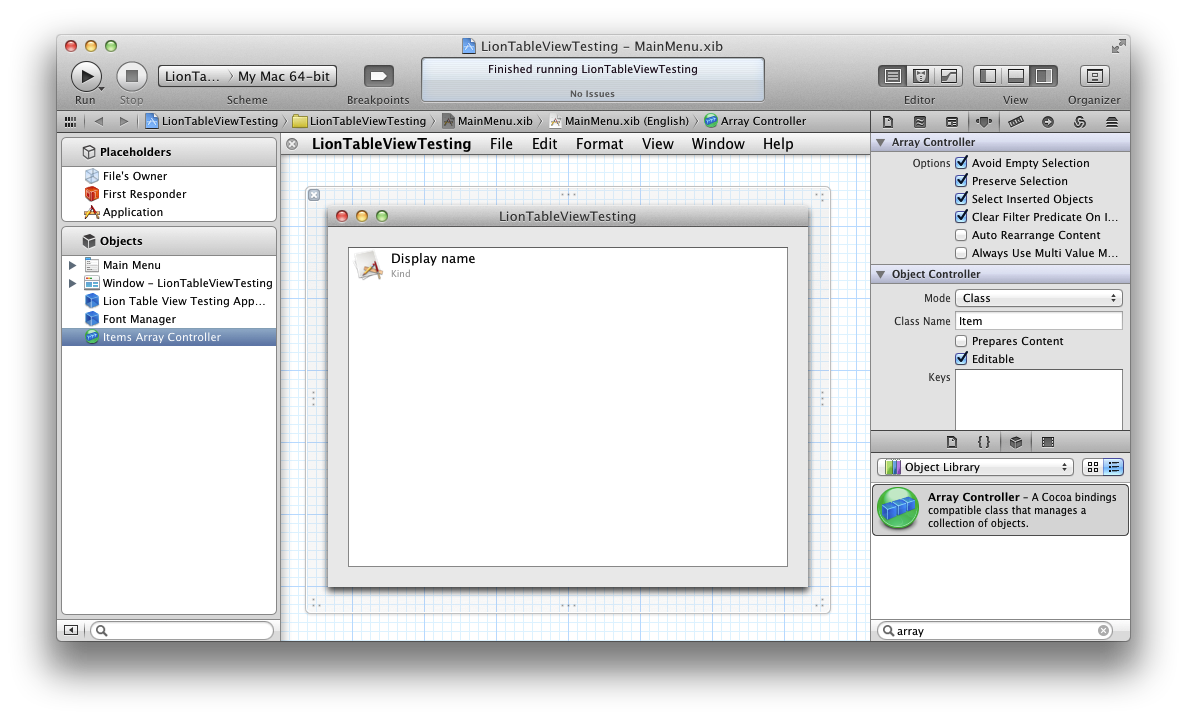
So far, so good. But we want to use bindings to get rid of all that
controller code. First of all, we will add a NSArrayController to our
xib file and link the table view to it, so drag one from objects library
into the objects section. I’ve also renamed it to Items Array
Controller and changed it’s Class Name to Item (this isn’t strictly
necessary for our example since we don’t add any new items dynamically,
but it’s still good practice to use proper class). Then setup the
controller to use our array of items as source - bind Content Array to
Lion Table View App Delegate with model key path items. Here are
screenshots for both steps:

Then we need to setup our table view to use the array controller as the
source. Select the table column and change bind it’s Value to Items
Array Controller with Controller Key set to arrangedObjects and
empty Model Key Path. This last part is crucial as we want to get the
the “whole” Item object to our cell view, so we can bind the subviews
to it’s various properties. Note that Xcode will show you a read warning
icon inside model key path text field, but it’ll compile and work
without warning:

Now we need to bind individual cell view controls to properties for the
associated Item instance. Select the icon image view and bind it to
Item Cell View with Model Key Path set to objectValue.itemIcon.
Repeat this with display name and detail text fields, using
objectValue.itemDisplayName and objectValue.itemKind for their model
key paths. Here’s the screenshot for icon view:
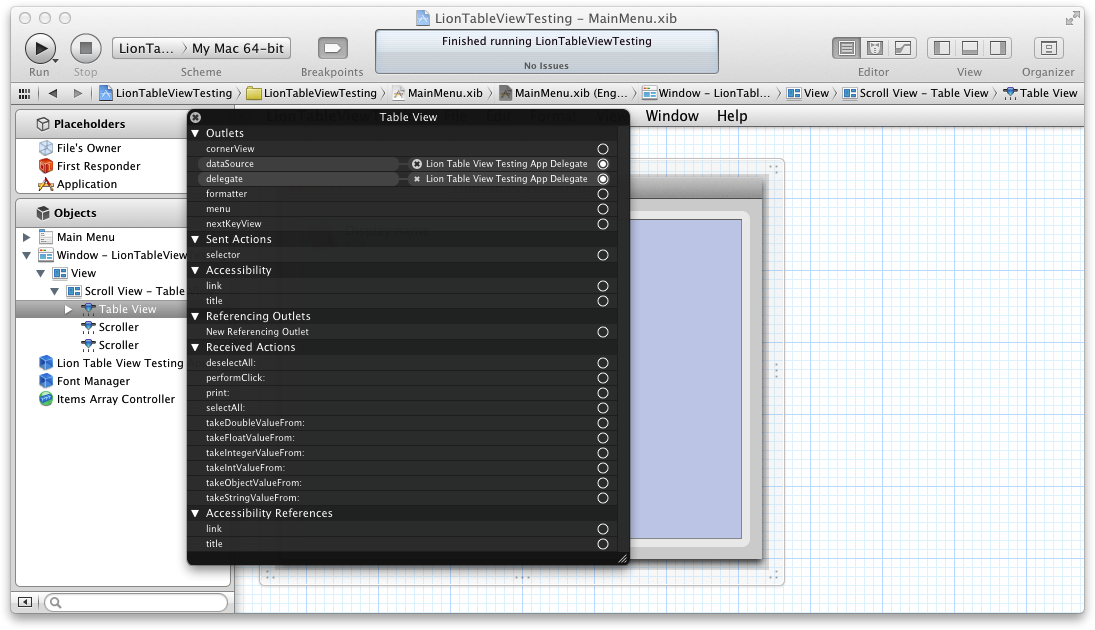
We don’t need to have table view data source and/or delegate anymore, so go ahead and unlink those two - right click on table view and click the small X near the dataSource and delegate links like this:
Then go to LionTableViewTestingAppDelegate class and delete both data
source methods: numberOfRowsInTableView: and
tableView:viewForTableColumn:row: (also remove both protocol adoptions
from header file)! Now run the app and there you go, all data’s there:
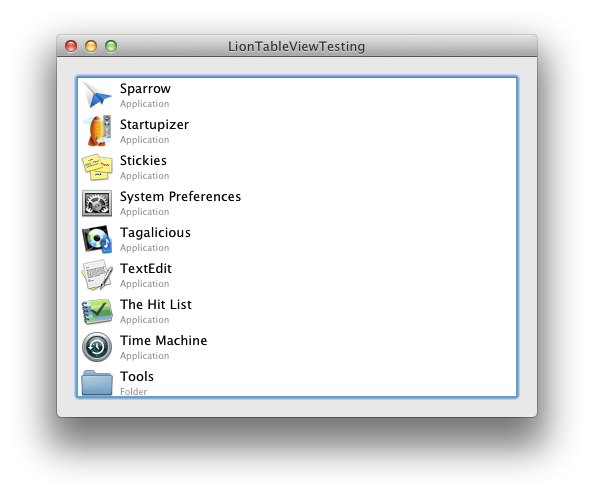
As the matter of fact, there’s no change, the app still looks exactly
like before, except that we don’t use any code in our app delegate
anymore, it’s all automagically linked in with NSArrayController and
bindings inside the xib file.
In fact, it might seem so magical, that it might require a brief explanation: how do the values get passed to our cell view controls? There are two ingredients to make this work:
- The first is the way we setup our array controller - we only
specified arrangedObjects for controller key and no model key
path. This will pass our
Iteminstances to individual table cell views, pushing them toobjectValueproperty of the cell views. - And this is rounded by binding cell view subviews to
objectValue.<keyPath> of their parent Item Cell View. As the
cell view holds an
Iteminstance, we can bind to it’s properties this way. For example: objectValue.itemIcon binds toitemIconproperty of theItemobject that is assigned to the cell view’sobjectValue.
Check LionTableViewTesting4 project to inspect the whole source code.
Note that using bindings you can even get away without subclassing
NSTableCellView! But for our example we still need the subclass in
order to properly handle detail text color when the cell view is
highlighted. We could even delete the detailTextField property from it
as we don’t have to reference it in code, but I decided to keep it there
- I think it’s a good practice to declare the properties for custom
subviews and connect them in IB. If for nothing else, it better conveys
the functionality our custom cell view subclass implements and gets us
prepared for future where we might need to use the code. However I’d not
go and create a custom cell view subclass just for this purpose, however
if you need if for other reasons, then you might want to add this few
lines of code to it too.
View based table view goodies (example 5)
Using view based table views gives us opportunity to implement stuff
that would otherwise be much more difficult or even impossible to
implement before. For example, as we are using real NSViews, we can
add Core Animation. Just to give you a taste, I’ll implement dynamical
height with nice animations when changing - I’ve seen this in Apple’s
table view
playground
sample code but is also something I wanted to have inside Startupizer
from the start. With view based table views, this becomes really simple
- just a few lines of code!
The plan is: we need to add a check box to the window that will allow changing the setting. Then we need to respond to changes and update row height. We’ll also adapt row appearance: for large layout, we’ll keep the same layout as now and for the small one, we’ll only show icon and display name without detail label.
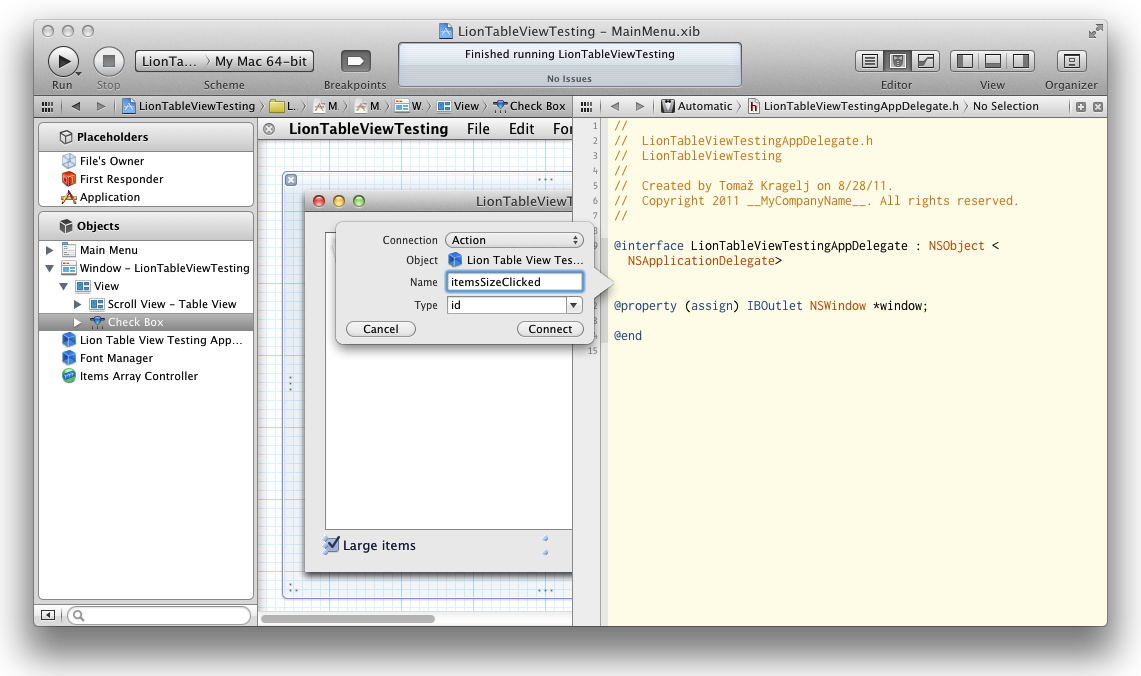
For start, let’s add the check box and wire it up to send the message when clicked to our app delegate. Drag a check box from objects library, position it somewhere on the window (I’ve placed it below the table view and changed the text and autosizing mask). Then control drag from the checkbox to app delegate and wire it up a custom target/action (you need to first create one manually or you can use Xcode 4 to do it for you - which is the method I chose). Here are the screenshots:

Then we need to tell each table row to change the size as well as tell the table view itself about the rows which size just changed (in our case all of them). As we now need to address our table view, we must get it out of the nib via an outlet. We must also assign our app delegate as the table view’s delegate in order to respond to row height callback and return proper row size. I leave both as an exercise for the reader. The code looks like this:
- (IBAction)itemsSizeClicked:(id)sender {
    self.isLargeSizeRequested = ([sender state] == NSOnState);
    [self.tableView enumerateAvailableRowViewsUsingBlock:^(NSTableRowView *rowView, NSInteger row) {
        ItemCellView *cellView = [self.tableView viewAtColumn:0 row:row makeIfNecessary:NO];
        [cellView layoutViewsForLargeSize:self.isLargeSizeRequested animated:YES];
    }];
    NSRange changedRange = NSMakeRange(0, self.tableView.numberOfRows);
    NSIndexSet *changedIndexes = [NSIndexSet indexSetWithIndexesInRange:changedRange];
    [self.tableView noteHeightOfRowsWithIndexesChanged:changedIndexes];
}

- (CGFloat)tableView:(NSTableView *)tableView heightOfRow:(NSInteger)row {
    return self.isLargeSizeRequested ? 34.0f : 20.0f;
}
Note that we need to store desired size state - we need to access it in
tableView:heightOfRow: method. I’ve done that through
isLargeSizeRequested property. Also note that we added
layoutViewsForLargeSize:animated: method to ItemCellView that will
take care of fading details view in/out. We could do this directly in
app delegate through detailTextField property, but it’s more OOP to
embed this in our custom class. Here’s the code:
- (void)layoutViewsForLargeSize:(BOOL)largeSize animated:(BOOL)animated {
    CGFloat targetAlpha = largeSize ? 1.0f : 0.0f;
    if (animated) {
        [[self.detailTextField animator] setAlphaValue:targetAlpha];
    } else {
        [self.detailTextField setAlphaValue:targetAlpha];
    }
}
The code is taken almost straight from table view playground sample. Running the app allows us to change the size by checking/unchecking the check box and the table view will smoothly animate to respond. But there are several issues with the implementation: First is immediately visible: when we start the application the table view uses small rows even though the check box is checked. Secondly: icon size doesn’t change. And lastly: when changing the size, only visible rows change, so when scrolling the table view, new rows don’t have adapt the settings.
Fixing the initial state is obvious: just set the value of
isLargeSizeRequested to YES, preferably in initializer. Second one
requires a bit more effort: we need to update
layoutViewsForLargeSize:animated: method to change the icon size like.
But doing this reveals another glitch - name label keeps its initial x
position which makes it a bit more distanced from the icon in small
mode, so we have to change it’s frame as well. Final code looks like
this:
- (void)layoutViewsForLargeSize:(BOOL)largeSize animated:(BOOL)animated {
    CGFloat detailAlpha = largeSize ? 1.0f : 0.0f;
    CGFloat iconSize = largeSize ? 32.0f : 16.0f;
    NSRect iconFrame = NSMakeRect(2.0f, 2.0f, iconSize, iconSize);
    CGFloat nameLeft = iconFrame.origin.x + iconFrame.size.width + 5.0f;
    CGFloat nameBottom = iconFrame.origin.y + iconFrame.size.height - (largeSize ? 18.0f : 16.0f);
    CGFloat nameWidth = self.bounds.size.width - nameLeft - 2.0f;
    CGFloat nameHeight = 16.0f;
    NSRect nameFrame = NSMakeRect(nameLeft, nameBottom, nameWidth, nameHeight);
    if (animated) {
        [[self.detailTextField animator] setAlphaValue:detailAlpha];
        [[self.imageView animator] setFrame:iconFrame];
        [[self.textField animator] setFrame:nameFrame];
    } else {
        [self.detailTextField setAlphaValue:detailAlpha];
        [self.imageView setFrame:iconFrame];
        [self.textField setFrame:nameFrame];
    }
}
It works, but it’s ugly and has a lot of dependency on measures - for simple demonstration it should do, but for real project you would want to make it respect offsets from IB. Or even better: adopt auto layout which would reduce the code to few lines only and remove all dependencies - perhaps I’ll do it in another blog post!
This leaves the last issue - new cell views don’t adapt to our setting.
This would be trivial if we used data source: just call
layoutViewsForLargeSize:animated: whenever updating table view cell
inside tableView:viewForTableColumn:row:. But we’re not using data
source, so we need to do it otherwise. First attempt might be within
awakeFromNib, but this wouldn’t work as table view only creates as
many instances to allow it cover the whole visual range and reusing them
from the pool afterwards. However the array controller does pass the
object value each time required, so we can override the setter and
layout from there. This presents another issue: to which size should be
layout the cell? It’s not entirely trivial, especially if you want to do
it properly. I’ve chosen to store last used size in a global flag and
use that value when setting object value like this:
static BOOL kLargeSizeRequested = YES;

- (void)setObjectValue:(id)objectValue {
    [super setObjectValue:objectValue];
    [self layoutViewsForLargeSize:kLargeSizeRequested animated:NO];
}

- (void)layoutViewsForLargeSize:(BOOL)largeSize animated:(BOOL)animated {
    kLargeSizeRequested = largeSize;
    ...
}
Far from perfect, and it would quickly become a problem if you wanted to
use two table views with the same cell view in the same app, each one
using different size mode. But programming is always a balance between
“the right way” and “the practical way”, so we need to take pragmatic
approach - for the purpose of this example, global flag works. For real
project, you might need to consider implementing data source in code,
thus providing your own intermediate code layer between array controller
and table view. Another solution might be to use NSArrayController
subclass which would invoke layout code when setting object value.
Check LionTableViewTesting5 project for complete code.
Conclusion
Using view based table views is not that much different from using
old-style, cell based, table views, but it provides a lot more
customization opportunities. At the same time, you can do much more work
within IB which not only provides simpler and quicker way of handling
the table, but also requires a lot less code. Think of all those custom
NSCell subviews and all the drawing code you had to write.
This post only serves as a quick intro, you should definitely check View Based NSTableView WWDC 2011 video and Apple’s table view playground sample code which served as the basis for this post.
Hope this post will help you get to speed with table views. It became rather large, but hopefully you’ve enjoyed reading as much as I did writing it…